Missing Pieces
Help
Missing Pieces
Help
Don’t stop searching for those missing pieces; if you do, you’ll never find what you’re looking for.
How to Register and Post your stories
First you must register. To do this go to the Login area and click the Register link just underneath it. Enter your details and hit submit. You are now registered!!!
To Post your story (I know it seems like a long set of instructions, but really it isn’t that bad, I promise.)
- Make sure your are logged in (if not a member already, register, see above).
- Go to Account Info
- Go to Add New Story or Add New Series
- Enter your title
- Leave co-authors blank if there are none or select from the dropdown
- Enter your summary (this is a mandatory field so you have to put something here) and this is what will be seen under your title and on the front page too for recent etc
- You can enter or leave blank the story notes area
- Pick your category and a list of subcategories automatically comes up under it and you pick which ones there. Press the > button and you will see it come up in the window to the right of it. If you want more than one, repeat that process and you will see your selection growing.
- Characters. You can select more than one character by holding down the ctrl button when selecting. Select as many as you want, although if it is all the charcaters, rather than select them all individually, just pick the “All the characters” instead.
- Genre. You can select more than one genre by holding down the ctrl button when selecting.
- Warnings. Please add appropriate warnings if necessary, if none are needed, then just leave it blank
- Ratings. It must be rated appropriately or the site (ie me) can get into a lot of trouble if anyone complains. You cannot submit your story without choosing a rating.
- If it is complete, check the complete box, leave empty if not. Later, you can check that after all your chapters have been submitted and the story is complete.
- If it is part of a round robin, check that, otherwise leave blank.
- You can add a title to your chapter or leave it as the default (chapter 1, chapter 2 etc)
- You can add chapter notes (story notes show up on the story index, chapter notes will only display on that one chapter) or you can leave blank.
- FINALLY were are at the story part. Paste your story in here (or if you have a .txt file NOT a word document, you can use the upload option instead) If you are pasting from Word, then use the little clipboard with the W on it (see diagram). When pasting from Word, it can be a bit tricky and it messes with the formatting, so you may get some unexpected results: like too much spacing between lines, or no spacing at all. Use the Word clipboard option to minimise the problem with formatting
- End notes if you want any.
- Use preview to check it out and then make any changes
- When you are happy, press add story and you are done!!!
Now the world can see your story!
Just a side note, pasting from Word can be a bit tricky and it messes with the formatting, so you may get some unexpected results: like too much spacing between lines, or no spacing at all. If you have big hassles, let me know and either we can help, or if it all just becomes too much, we can post it for you. (Word is not very net friendly unfortunately).

Insert Image
How to code a picture into your story or summary.
1. First, load the picture into your account by going to Account Info in the menu and then selecting Manage Images. You can upload jpgs, gifs and png formats and the pics must not be too large or the script will reject them. The maximum size of a picture is 300 x 300.
This will load your picutre into your account folder and it will be stored in your folder with your stories.
2. You should see a list of your pictures you have loaded and the code that will be required. Copy the code of the picutre you want. It will look something like this:
< img src=”stories/1/images/yourpic.jpg” >
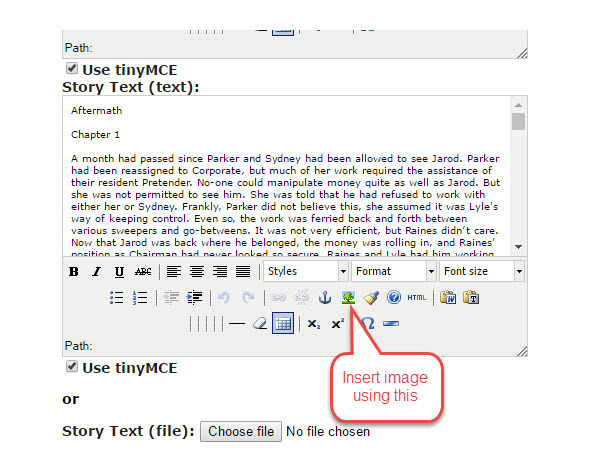
If you are using tinyMCE (the thing with the formatting buttons on)
3. Click the image button (the one with the little tree) and that will bring up a popup window.
4. You can enter an offsite url for pictures hosted elsewhere in the url field, or you can click on the pulldown ‘image’ and that will display the images you have previosly loaded into your account. Choose the one you want and and press insert. If the little dropdown does not display your pics, the past only this part of the code into the image url area: stories/1/images/yourpic.jpg
5. Format it as you would normally.
If you are NOT using tinyMCE
3. When editing your story or series etc, you will need to uncheck the tinyMCE and this will show you your text in code form.
4. To insert your picture, you paste that code < img src=”stories/1/images/yourpic.jpg” >, or a normal img src link if the picture is hosted offsite, in where you want your picture to go and then turn tinyMCE back on. Then you can space, center, format as you wish and your pic should be there.

And then you are done. Yay.
Please note, any images uploaded on Missing Pieces will NOT display on any other websites outside of the PretenderCentre, so you will be unable to hotlink them. Any inappropriate pictures will be removed.